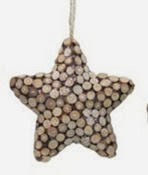
 A few weeks ago my friend, Kris, asked if I could “Saritify” some ornaments. Her word, not mine. She bought some simple ornaments and then some ribbons, bells, red berry stems with silver and a few other things. My job was to add some character and personalization. So, this was my starting point.
  She bought 5 of each ornament. She got these cork stars from Target.
 I Just hot glued a simple band of ribbon around the star and added a bow in the center. The corks already have some glitter on them so the glitter in the ribbon matched perfectly.
 The key was silver not gold when I started. I wrapped glitter ribbon around it. Secured it with hot glue and couldn’t resist adding a little bling that I already had.
  These started out as plain wooden stars with glitter in the center. The first one I added a gold ribbon around the outside an then a simple knot at the top. That is what I call a cheater bow.
  I grabbed a couple stems and cut them down. I used hot glue to tack them down to the center and then covered it with the small handmade bow. To make this I used a fork. It was one of my first pins ever. But now I can’t find it. Repinned, you can see it on my Crafty Tips Pinterest Board It worked! Even though I chose a wider ribbon, our fabulous striped chevron, it worked well. I hope this inspires you! Shop your own crafting stash, and consider the possibilities! It might be too late now, but be sure to Pin it for next year! Until Next Time- Capture Life! Sarita


