My Creative Cottage - Connect. Create. Celebrate with Chalk Couture.

  • Facebook
  • Twitter
  • Pinterest
  • Instagram
  • RSS
  • Email

Menu

Skip to content
  • Home
  • Book Your Private Event
  • Shop Supplies
  • Project Gallery
    • Customer Gallery
    • Barn wood
    • Cricut
    • Paper Crafting
  • My Cottage Studio
  • Blog
  • Contact Us
  • Meet Sarita

Find Your Style- Beautiful Friend Card With Dress Form

1 / 1 / 112 / 2 / 16

You are about to embark on an inspirational journey with almost 60 consultants showcasing this fab set.  If you have come here from Cindy’s Blog, you are on the right path.  This is simple to do – just click on the link at the end of the post on each blog to move to the next one! Here we go!

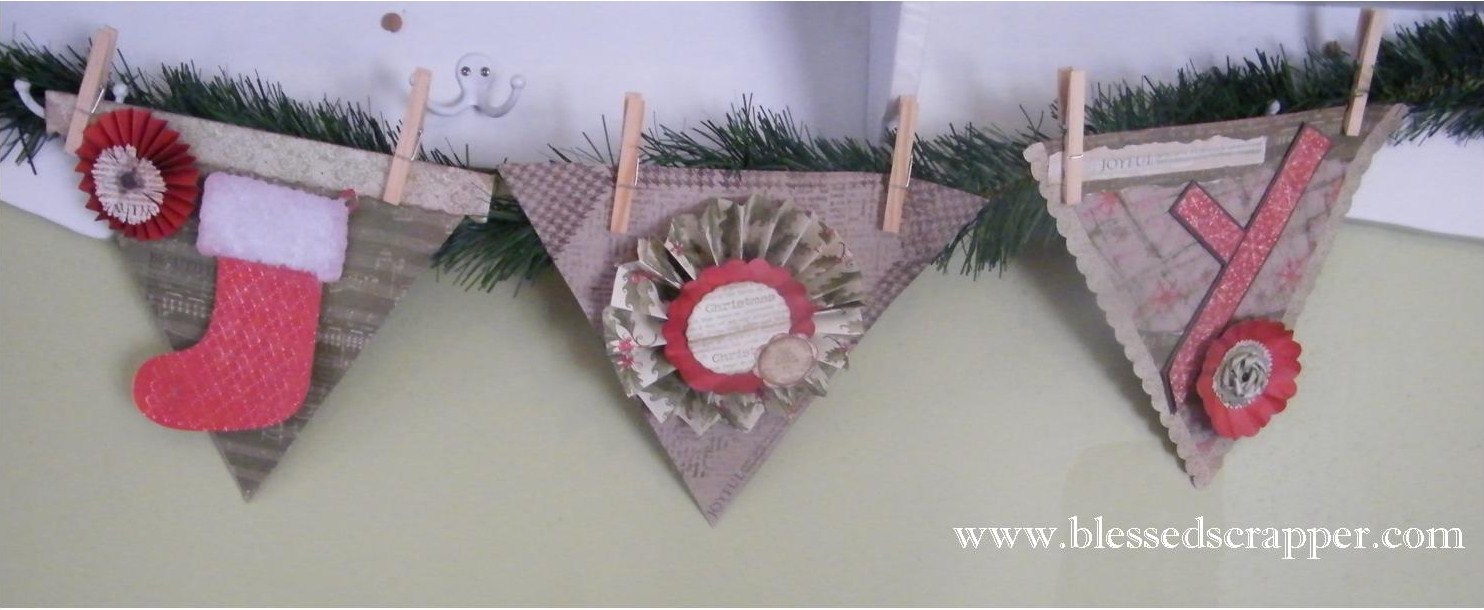
I fell in love with the mod yet vintage flair of this set. Here I chose to do a 5×7 card.

TECHNIQUE

I stamped the dress form in White Daisy pigment ink, then set it with a heat gun. Since it was dry I could highlight some of the words with our colored pencils. I inked the paper flower in Lagoon ( a turquoise color) to bring out the blue tones and then stamped it with the friend sentiment to add some depth.

Beautiful Friend Dress Card_My Creative Cottage

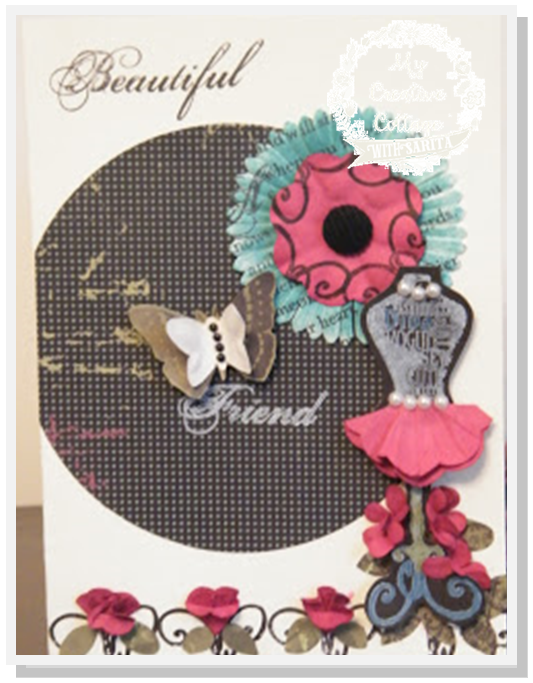
Above the stamped “Friend” I cut a butterfly out from another sheet of Wings paper and to add dimension I added a paper butterfly which can also be found in the paper flower pack along with some black opaque embellishments.

I loved the flourish on the dress stand so I turned it upside down and used it for a border on the card. Then it looked like flower stems so I grabbed my paper flowers and started playing with them. I twisted them up around the bottom of my paper piercer ( kinda like when you made tissue paper flowers as a kid). I also stamped that same design on the red flower to add some pattern to the outer edges.  In the middle sits a corduroy brad to anchor it all down. You can’t have flowers without leaves so I freehand cut some out of the pattern paper
Once I started to twist and scrunch the paper flowers I was inspired to add a “skirt” to the dress form as well. I simply folded a flower in half and pleated it.  Every girl loves pearls so I grabbed some of our Opaque pearls to make a necklace and a belt.
I hope you enjoyed and will allow yourself some playtime when you get this fabulous set! The possibilities are truly endless.
 Now, hop over to Melissa’s Blog to see what she has created.  Be sure to visit all the Consultants at their Blogs to get some great crafting ideas and other fun ideas!
Have a happy, blessed, creative and inspired NEW YEAR!
Sarita

Share
  • Pin it
  • Share
  • Tweet
  • Share
  • Email
Share
  • Pin it
  • Share
  • Tweet
  • Share
  • Email

Christmas Recap and Happy New Year!

12 / 31 / 108 / 26 / 15

The last 2 weeks have been filled with family traditions and celebrations.  The Schraeder tree was adorned with new ornaments from St. Nick when he visited on Dec. 6th. I got a Snow Baby, Sofie got a Santa one and Scott got a sock monkey that was going fishing.  Savana got a flamingo to represent the Waterford Flamingos.

Most nights were spent watching Christmas shows and chilling out.  This is a huge part of our traditions at this time of year.

Scott had a birthday sprinkled in on Dec. 20th. Our family has actually made a whole separate holiday called “Scottwanzaa”,  also known as the 5 days of Scott.  So this year I spoiled him with a surprise facial and massage and lots of other goodies throughout. I took him out for a nice dinner and then out to Martini Moz. Enough said there. Happy 40th baby!!

The girls both perfomed in the church Sunday School program. We were so proud of Sofie who knew many of the words and loved watching her little head bob up and down to the music.  Savana accompanied the whole church on her guitar with “What Child is This.” Yes, I cried. I was so proud of both of my girls!

We continued the Scottwanzaa/Christmas celebration with his brother and wife. It was the kick off to the official Christmas week.

On Christmas Eve we were completely surprised when my grandma, known as Ma was sitting in my living room when we returned from church.  My brother, Craig, drove all the way down to Arkansas and brought her home for Christmas as my Mom’s gift. It was a great gift for all of us to spend time with her.  Can you belive she is 89 years old? Doesn’t she look amazing???

To the Cloud? I wish. But this is the best we got.  A nice 4 generation pic of the girls, my Mom, Ma and me.  These are defnitely moments I treasure and will be in scrapbook layouts to come!

Sofie loved her pillow pet that Santa brought her.  She was co cute all day just randomly putting it out in the Universe, Thank You Santa for my pillow pet.  She is so sweet and will NEVER stop believing in Santa. She brings a lot of smiles and magic to the holidays that’s for sure.

Savana got this adorable hat and knee boots from my Mom.  Let me say I will be stealing it. She looks so cute in it.
There were many gifts given and reeived this season, but I got the BEST gift of all.  It is one of love and sacrifice and humility.  My husband submitted his official letter of resignation to the Army National Guard. Next year we will celebrate his retirement and 20 years of service. Look out 2011 is going to be monumental in the Schraeder house!  I know this was not easy for him and it will be a transition for all of us, but I am so looking forward to having my hubby around more and starting a new chapter in our lives without the military. 
Peace to all in 2011
Happy New Year
Sarita

Share
  • Pin it
  • Share
  • Tweet
  • Share
  • Email
Share
  • Pin it
  • Share
  • Tweet
  • Share
  • Email

Santa’s Workshop a Success After a LONG Week

12 / 12 / 108 / 26 / 15

This was a perfect end to an awful week. I don’t usually say anything is awful, but when you wake up on Monday to find your eye glasses in 2 pieces (I fell asleep with them on and broke them) you know it’s going to be a LONG week. This was also the morning Savana chooses to miss the bus. Hmmm.. I can drive blind. SURE! So, I dropped her off and then had to go buy some super glue! LONG LIVE SUPER GLUE! I was able to repair them and then reluctantly went and ordered new glasses.  Just in case.

Then fast forward to Thursday when I was helping Sofie in the shower. As I was bent over washing her hair she had a sudden burst of excitement and jumped up full force and knocked me in the chin with he head.   All 63 pounds of her full force. I almost passed out. Thank GOD Scott stayed home to go to her concert that day.  Her rescued HER and I iced my chin.  She actually cried when it happened. That is a rarity as she has a very high tolerance for pain.

So, we got her ready, off to school, went to breakfast, shopped, wrapped, went to the concert, then it was off to a doctor’s appt.  At which her doctor said the nicest thing. “You’re Mommy looks tired” Why is it that sometimes you just want that validation?  She was a perfect angel the whole time ( of course!) and then we endured an hour and a half drive home in rush hour traffic and snow!

So, watching children and their Moms make some super cute projects that they were so proud of was the perfect cure for a crazy long week!  I really enjoyed spending my day with Savana. She worked out there all day assisting, holding babies and really was my right hand girl. I couldn’t have done it without her!

Photo holder made with coasters, clothespins and love were a huge hit!


Christmas gift Photo Holder

We also transformed an ordinary lunch bag into a gift bag with a stamped tag

Cone ornaments were also a hit. They loved the stamping and were really getting creative with their choices of color and stamps.

Sofie did a great job with a little help from her big sister.


Lisa S. and her granddaughter had a great time.


Lexi was very proud of her creation.
I already can’t wait for next year.  I suggested in the spring we could do it again for Mother’s Day, BUT the DADs could bring the kids. For some reason that brought on a lot of laughter.
Hmmm.. I think we should try it.

For each project the kids completed, the moms got to enter a ticket into a drawing for some give-aways.  Congrats to the winners!

Lisa W.- Pack of handmade cards
Penny P.-Stamp set
Heather B.-Stamp set
and the grand prize went to Candi C.- scrapbook kit and 2 stamp sets

Thanks again everyone for a fantastic event and choosing to spend your time with us.

Blessings-
Sarita

Share
  • Pin it
  • Share
  • Tweet
  • Share
  • Email
Share
  • Pin it
  • Share
  • Tweet
  • Share
  • Email

Joy Banner from Recycled Cardboard and Mistletoe Paper

12 / 9 / 108 / 26 / 15

I wanted to make a vintage/rustic banner for my cottage.  Instead of buying chipboard, I used the cardboard inserts that come with some 12×12 scrapbook paper pads. Since they are 12×12  I was able to cut out some nice large triangles.

Once I had my base I just used ink, paper and ribbon to decorate and then simply attached it to my garland with clothes pins instead of adding ribbon in between.

I used left over papers from my Mistletoe Workshop on the Go. I love this paper for it’s classic Christmas color palette.
For the rosette I stamped directly onto a paper flower with a favorite stamp,
State of Mind. I love anything with words!
I cut out the stocking with my Cricut. Then embossed with the Argyle Cuttlebug Template and sanded it to reveal the pattern.  For a finishing touch I added Fun Flock for the stocking fur. You could always use fiber fill or even cotton balls in a pinch.  What ever works for you!
Added a ribbon flower to the center of a scallop shape.  Then I adhered it to a paper flower. These are so fun to make and there are lot of tutorials on Pinterest.  I have one on my Scraps of Fabric Board.
I disguised a  fan fold flower, also known as a rosette for the letter “O”. I wish you could see it up close, I used a glimmer mist spray with desert sand and pearl paint.  It gives it a hint of a golden shimmer.


So, I hope you are inspired now to grab your cereal boxes, cardboard inserts and make a fun banner for your home!

Blessings-
Sarita

Share
  • Pin it
  • Share
  • Tweet
  • Share
  • Email
Share
  • Pin it
  • Share
  • Tweet
  • Share
  • Email

Mistletoe Christmas Scrapbook Layouts and Cards

12 / 2 / 108 / 26 / 15

This is by far my favorite Christmas paper.  I love the traditional feel of it with the classic colors of the holiday.


PLUS! we add in the beautiful adhesive artwork known as My Stickease.  So, we get the best of both worlds. We get to stamp and enjoy learning something new and then we get to complete 2 more layouts in no time at all. These layouts are picture ready for your special photos.

Christmas Ho Ho Ho Layout_My Creative Cottage

I need to do the journaling. So here’s the story I will tell. This was a very impromptu visit to Santa while on a trip to Kansas.  We went into town and were not prepared for a photo op. But the girls were game and I said why not! Take a closer look at Santa’s face in the lower left corner. I wish I knew what Sofie told him because his eyes look like they were going to pop out of his head!

Christmas Scrapbook Layout_ My Creative Cottage

I have been waiting since 2005 to find the right layout for this picture. If you look closer Sofie has my “It’s a Wonderful Life” snow globe box on her head and it just cracks me up.  This was the year Scott got back from Iraq. So as he was putting up the Noel stocking holders he changed it to read “LONE” to represent how he felt the year before and then he changed it to NOEL and grabbed up his girls.  It was so cute so of course I had to take a picture.  You can tell there was so much happiness that night. I’ll never forget it.

Here we added Liquid Glass to the candy sticker to give it a glossy look.
Now, I have a layout all ready to go for this year. I LOVE scrapbooking kits!
Christmas Layout_ All Through The House_ My Creative Cottage
Christmas Card_Stamping_My Creative Cottage
Rock and Roll Technique: That is when you ink up your stamp in a lighter color and then roll the edges into a darker color to get a

Share
  • Pin it
  • Share
  • Tweet
  • Share
  • Email
Share
  • Pin it
  • Share
  • Tweet
  • Share
  • Email

Dec Stamp of the Month Blog Hop- Amore Christmas Card

12 / 1 / 108 / 26 / 15

You will love the timeless appeal of  “Amore” and it would work well for weddings, anniversaries and of course Valentine’s Day!

If you have come here from Carol’s Blog, you are on the right path! This is simple to do – just click on the link at the end of the post on each blog to move to the next one! Here we go!

With it being so close to Christmas I had to showcase a card I made using the gorgeous heart from the set. After all Christmas is about ultimate love. I popped it up with foam tape and added a few sparkles.
Then I added a sentiment from Snow Flurries Stamp Set.  I am sure this very design with different paper and sentiment would look great too.

Christmas in the Heart Card_My Creative Cottage

Now you are on your way to Jill’s Blog to see what fabulous creation she has cooked up! Thanks for stopping by and keep on hopping!

Many Blessings-
Sarita

Share
  • Pin it
  • Share
  • Tweet
  • Share
  • Email
Share
  • Pin it
  • Share
  • Tweet
  • Share
  • Email

Dec Stamp of the Month Blog Hop- Amore

12 / 1 / 10

Welcome to our Close to my Heart Stamp of the Month Blog Hop. Here you will find creations by over 50 talented consultants that will amaze you with their creative ways to use this set.  You will love the timeless appeal of  “Amore” and it would work well for weddings, anniversaries and of course Valentine’s Day!

If you have come here from Carol’s Blog, you are on the right path! This is simple to do – just click on the link at the end of the post on each blog to move to the next one! Here we go!

With it being so close to Christmas I had to showcase a card I made using the gorgeous heart from the set. After all Christmas is about ultimate love. I popped it up with foam tape and added a few sparkles.
Then I added a sentiment from Snow Flurries Stamp Set.  I am sure this very design with different paper and sentiment would look great too.

Be sure to add this gorgeous set of 13 stamps to your club or party order this month.

Now you are on your way to Jill’s Blog to see what fabulous creation she has cooked up! Thanks for stopping by and keep on hopping!

Many Blessings-
Sarita

Share
  • Pin it
  • Share
  • Tweet
  • Share
  • Email
Share
  • Pin it
  • Share
  • Tweet
  • Share
  • Email

Christmas Cards Galore!

11 / 29 / 109 / 11 / 15

I had fun creating these, but my favorite has to be the clear card that I ran through the Cuttlebug.  My workshop participants had a great time with a whole pack of blue and green sparkles to add bling as they pleased.  Below are just a few of the cards we made.
Blue and Green Christmas Card_My Creative Cottage
It’s hard to see, but the top layer of this card is actually clear.  So, I ran it through my Cuttle Bug. It embossed the snowflake pattern beautifully.  You can see the sparkles were a fun accent.


Reindeer Christmas Card_My Creative Cottage
A simple reindeer one with layered pieces, red ribbon and sparkles.

Snowman Circle Card_My Creative CottageInspired by Paper Crafts magazine. I used the Smiley Cards Cricut Cartridge to cut the card base.   You could use a plain circle shape and weld the tops together for a circle card too. That can easily be done in Cricut Design Space.  The hat and scarf were stamped and cut out.

Star Christmas Card_My Creative Cottage

Simple and only one layer.  With a little bit of bling is still quite the statement.
Thanks for looking!  I hope you are inspired to create your own Christmas cards. If not. maybe pin it and save it for later when you are ready!
Until Next Time-
Be Blessed!
Sarita

Share
  • Pin it
  • Share
  • Tweet
  • Share
  • Email
Share
  • Pin it
  • Share
  • Tweet
  • Share
  • Email

Saying Thanks is Fashionable All Year Long! Mini Purse and Cards

11 / 24 / 109 / 8 / 15

A great way to say thanks to your girlfriends!

November is my most favorite time of the year.  Time to reflect on all of our blessings.  Through sharing my love for scrapbooking, stamping and life itself, I have found my calling.  I have a job I love and the freedom to be a hands on Mom.  I am here when my husband needs me and we all get to gather around the dinner table every night.
I have gained another family too.  I  always wanted a sister, and now I have MANY, even long distance ones.  Through team building I have connected with the greatest group of women.  They are all so thoughtful and caring.  The funny thing is they always show up at just the right time with coffee, lunch, a hug or a much needed phone call. I am so blessed!
So, I thank God and I thank you, my sisters in crafting! I don’t even want to think about what my life would be without you all!
***************************************************************************************
3x3 Mini Cards and purse
Which leads me to the perfect gift for friend.  I used my favorite November Stamp of the Month. Although this set is perfect for this Thanksgiving season, it also looks great with other color combos for the every day. I chose cotton candy, black and sweet leaf. I made a sweet little purse, that I found on the Paper Crafts website and embossed it with the Cuttlebug.  What better to fill it with than little 3×3 cards which can also double as gift tags.  I love the rounded corners on the cards as it adds a little softness.
I am so thankful for card_My Creative Cottage Graditude cards with purse_My Creative Cottage Black and pink embossed purse
With a few buttons and bows these sweet cards now have some added charm.

 See,  little cards and tags don’t have to be boring!

Until  Next Time-

Be Blessed!

Sarita

Share
  • Pin it
  • Share
  • Tweet
  • Share
  • Email
Share
  • Pin it
  • Share
  • Tweet
  • Share
  • Email

Handmade Christmas Ornaments in Minutes

11 / 23 / 1011 / 7 / 17

Handmade Ornaments Using Scraps of Paper

I have been having so much fun using these awesome Dimensional Elements  Ornaments. They have a back and a front so it is easy to cover and assemble.  Here are some I created with leftover papers   You can see them on my tree in the cottage when you come for your next class or workshop.

Christmas tree with handmade ornaments_My Creative Cottage


Handmade ornament with paper scraps

Look closely and you can see my paper chain. I love this from my childhood. Now it’s tricked out with pattern scrapbook paper.  Who knew I would still be playing with paper well into my adulthood!

Handmade ornament with scraps_My Creative Cottage

Here I inked the top layer in cocoa and covered the back part with Mistletoe Paper.  For added elegance I chose opaque pearls to accent.
Handmade ornament with paper scraps
I used the same technique here. Plus, I added a paper poinsettia flower.
 Handmade ornament using glitter and paper flowers
On this one I used a liquid glue pen to cover the outer layer and added red glitter. I wish you could see the sparkle.
Handmade ornament with chipboard and stamping_My Creative Cottage
I covered a chipboard piece from my Mix and Mingle Album.  I also inked the smallest ornament and added it to the larger decoration.  I love adding dimension with layers.  This would also make a really cute tag on a gift.
I hope you are inspired to create your own handmade ornaments with your paper scraps!
Until Next Time-
Be Blessed!
Sarita


Share
  • Pin it
  • Share
  • Tweet
  • Share
  • Email
Share
  • Pin it
  • Share
  • Tweet
  • Share
  • Email

Posts navigation

Previous Page 1 2 … 18 19 20 21 22 … 40 41 Next Page

Hi! It's me, Sarita. A.K.A. Blessed Scrapper. DIY is in my DNA. Life is a constant adventure with a child on the Autism Spectrum and my own AD/HD. I am a life long learner and I love to share with others. So, I hope you'll find something here to inspire you!

Archives

Meta

  • Log in
  • Entries feed
  • Comments feed
  • WordPress.org

Tags

3-D 3x3 cards Anthology autism Autism Awareness Month barn wood Birthday birthday cards birthday craft Blog Hop card Cards Christmas Christmas Craft Class Close to My Heart Cricut Cricut Artiste Cartridge CTMH DIY Easter Fall family life Gift Bag Halloween home decor kids mini album My Creative Cottage paper crafting Party Decorations random stamping scrapbooking scrapbooking layouts scrapbook layout Scrapbook Layouts stamping Stamp of the Month Studio J tags Valentines Vintage Vinyl Wall Art Waterford
Site made with ♥ by Angie Makes
Angie Makes Feminine WordPress Themes
Manage Cookie Consent
To provide the best experiences, we use technologies like cookies to store and/or access device information. Consenting to these technologies will allow us to process data such as browsing behavior or unique IDs on this site. Not consenting or withdrawing consent, may adversely affect certain features and functions.
Functional Always active
The technical storage or access is strictly necessary for the legitimate purpose of enabling the use of a specific service explicitly requested by the subscriber or user, or for the sole purpose of carrying out the transmission of a communication over an electronic communications network.
Preferences
The technical storage or access is necessary for the legitimate purpose of storing preferences that are not requested by the subscriber or user.
Statistics
The technical storage or access that is used exclusively for statistical purposes. The technical storage or access that is used exclusively for anonymous statistical purposes. Without a subpoena, voluntary compliance on the part of your Internet Service Provider, or additional records from a third party, information stored or retrieved for this purpose alone cannot usually be used to identify you.
Marketing
The technical storage or access is required to create user profiles to send advertising, or to track the user on a website or across several websites for similar marketing purposes.
Manage options Manage services Manage {vendor_count} vendors Read more about these purposes
View preferences
{title} {title} {title}